
I confess, I've fallen into a habit of getting takeout more often now.
Before we moved into the house, living at our tiny apartment was simple. I cooked all the time and we would occasionally treat ourselves to eating out or ordering pizza. For our first night of living in the new house, we bought takeout to treat ourselves after moving. Things were busy for the two of us--I had work 9am-5pm and my boyfriend had work 4:30pm-2am. There was a lot more prep needed in the morning or at night to prep breakfast, lunch, and dinner for all (including my 3 cats and dog!). So then, it became more of a habit to order takeout when we had a lot less time to unwind.
Personally, I really love cooking. I wish I could spend all day cooking, perfecting a recipe. (Hello, Barefoot Contessa.) I talked about this with my boyfriend when he asked me to pack two dinners for him since he often got hungry at work because of the way his hours are. I told him how if I didn't work, I would gladly spend more time to prep delicious meals for him. And we agreed that, in the future, when he could support it, I would get to stay at home. Perhaps I exhausted myself covering everything when he was unemployed, but it really felt reassuring that he supported me and we came to the mutual decision to work towards that.
But for now, I cook when I can. If I'm not sick or lacking sleep, I spend almost my whole morning from 7 until I head out to prep food. Prior to 7, I prep the fur babies' food. I don't spend any time watching TV in the morning anymore. All I do is get up, feed the pets, eat a quick breakfast, cook, and get ready for work. And in the evenings, I am usually tired and just want to unwind. So if it's cooking, I try to do something fast or easy that I can let sit on the stove for a while. And when we want to, we don't feel guilty for choosing takeout over a home-cooked meal. We enjoy what we can. :)
Showing posts with label home cooking. Show all posts
Showing posts with label home cooking. Show all posts
Friday, February 27, 2015

Thursday, October 2, 2014
A Grocery Budget vs Eating Healthy
I came across a great article today talking about food inequality. You can read it here. The article talks about the stigma of fast food vs healthy food for low income families. It talks about how income (or lack thereof) highly influences decisions to purchase one item over another. When there's a whole family to feed, the unhealthy carbs are more cost-effective and keep everyone full.
I didn't grow up poor, but I understand what it's like to make food choices. My family would fall into the lower-middle class. We were a family of 4: my parents, myself, and my younger sister. Both of my parents worked full-time. My sister and I were somewhat picky eaters, but we'd always have food on the table and snacks for after school. Growing up, my mom would bring us with her for grocery shopping so that we could learn how to pick things like veggies and meat. I had always paid close attention, trying to absorb the information in--and it worked. I am now on my own and making my own food choices.
Thinking back, I didn't know what the grocery budget was. At one point though, my mom had been trying to make some extra money to have more for groceries because both me and my sister were growing kids and needed more and more food to sustain us. We got groceries from Shoprite, Costco, and the local Chinese market. Sometimes, my mom would weight the fruits or vegetables as she gathered them into the plastic bags. She'd ask us what we wanted to have for dinner and we'd go and look for ingredients. It was great when we developed a love for something like bok choy and it was cheap yet healthy. She would firmly tell us when, no, we couldn't have salmon because it wasn't on sale. We'd get frozen dumplings or chicken cutlets. Fresh vegetables includes bok choy, bean sprouts, and broccoli. Our family lived off of rice and we'd only buy boxes of pasta if it was $1 or less. With that came jars of pasta sauce (also $1 or less) and some ground pork (from the Chinese market rather than more expensive beef) to add to macaroni. Mom would let us get crackers or cookies for snacks. We also had cheap ramen or cup noodles on hand where we'd cook it in a bowl and add ingredients to it (eggs, scallions). She would pack everyone lunches every day. Sometimes it was a small thermos of fried rice or a Hot Pocket wrapped in foil (ham and cheese was my favorite until meatball mozzarella came along). Overall, I estimate our weekly budget was less than $100/week for a family of four. It is probably average for our income and lifestyle, but for those less fortunate, a lot of concessions would have to be made.
I think why an article like the one above resonates with me. I understand the difficulties and the choices, and now that I'm living on my own, I am understanding the difficulties of needing convenient choices vs eating healthier. Even now, I only buy grapes, my favorite fruit, when it's on sale. That's why, a project like Good and Cheap by Leanne Brown is wonderful! Cookbooks nowadays are focusing more and more on eating fresh foods when in season, but also using ingredients within your means to create a sustaining meal.
For my sister and myself, we ended up more and more involved in our food choices when we started watching Lidia Bastianich and Jacques Pepin on PBS. When we got home from school, Rachel Ray would be on. We developed our own passion for cooking and exploring different foods and that helped shape what we bought for groceries. It was homemade and not necessarily the healthiest (think: meatloaf) but it was wholesome and we enjoyed it. Now, when I cook for myself, I try to make healthy choices, but also allow for the occasional ramen or chips to fill me up. And that's okay.
I didn't grow up poor, but I understand what it's like to make food choices. My family would fall into the lower-middle class. We were a family of 4: my parents, myself, and my younger sister. Both of my parents worked full-time. My sister and I were somewhat picky eaters, but we'd always have food on the table and snacks for after school. Growing up, my mom would bring us with her for grocery shopping so that we could learn how to pick things like veggies and meat. I had always paid close attention, trying to absorb the information in--and it worked. I am now on my own and making my own food choices.
 |
| Just two girls growing up in Jersey. |
 |
| Cup Noodles with Fish Balls & Scallions |
For my sister and myself, we ended up more and more involved in our food choices when we started watching Lidia Bastianich and Jacques Pepin on PBS. When we got home from school, Rachel Ray would be on. We developed our own passion for cooking and exploring different foods and that helped shape what we bought for groceries. It was homemade and not necessarily the healthiest (think: meatloaf) but it was wholesome and we enjoyed it. Now, when I cook for myself, I try to make healthy choices, but also allow for the occasional ramen or chips to fill me up. And that's okay.
Thursday, March 27, 2014
Easy Roasted Garlic
I'll admit, I wasn't always a garlic lover. As a kid, my mom had tried to sneak some minced pieces into the veggies and I just disliked it. (I loved garlic bread though..)
Nowadays, I LOVE GARLIC! It's a great thing to use to add flavor to your cooking and it's so versatile. You can chop it, add whole cloves, mince it, grate it, or use garlic powder. So many textures you can meld it into and so many ways to use it. Raw or cooked, it adds a savory flavor to your cooking.
Today, I'm going to show you my attempt at roasting garlic. Roasted garlic is so delicious by itself and great for adding flavor into your sauces, spreading on bread, or melting into stock. Yum!

Easy Roasted Garlic
Ingredients:

Nowadays, I LOVE GARLIC! It's a great thing to use to add flavor to your cooking and it's so versatile. You can chop it, add whole cloves, mince it, grate it, or use garlic powder. So many textures you can meld it into and so many ways to use it. Raw or cooked, it adds a savory flavor to your cooking.
Today, I'm going to show you my attempt at roasting garlic. Roasted garlic is so delicious by itself and great for adding flavor into your sauces, spreading on bread, or melting into stock. Yum!
Easy Roasted Garlic
Ingredients:
- Whole bulbs of garlic
- Olive oil
This recipe is so simple--you just set a timer and you're good to go! Preheat your oven to 400 degrees F.
- Select a baking tray for your garlic - I used a metal tray with some depth and covered it with foil.
- Prep your garlic - Peel the outermost layers of the garlic and then slice off the top point
- Place your garlic into the tray and drizzle with olive oil to cover the top, exposed part of the garlic.
- Cover with foil and pop the tray into the oven for 30-40 minutes.
And that's it!
From most recipes I read, they say roast it for 40 minutes. For my garlic, I had some smaller sized bulbs so I probably shouldn't have left it in there that long, it became a little dry on some of the edges. So, it depends entirely on the size of your garlic and the true temperature of your oven. I would say it's best to check it at 20 minutes and if it's not the soft, melty color yet, you can check it again in 10 minutes.
After they're done, let it cool for a bit before squeezing the garlic cloves out of the flaky skin. You can just pinch the bottom of the bulb and the pieces, if done just right, will slide right out.
Here's how mine turned out:
You'll see that they are nice and slick from the oil and no longer white from the roasting process. (My lighting is pretty yellow though..)
Hope you'll give these a try sometime! I stored these in a glass container, but if you make A LOT, you could also freeze them for use later on.
Tuesday, December 10, 2013
Thanksgiving Recipes
November was a busy month for me since I was participating in NaNoWriMo to write a novel in 30 days. However, Thanksgiving is my favorite holiday of the year, so I still made the effort to make a delicious Thanksgiving dinner! Last year, I went to Virginia to visit my boyfriend's best friend's family. Typically, I would travel back to NJ for Thanksgiving, but seeing as my family is quite dispersed now, I decided to stay put this year. I spent Thanksgiving at home in Albany with my boyfriend and our dog and cat. We had a wonderfully lazy holiday together and it was time well spent.
The Menu
Garlic Herb-Roasted Chicken with Potato, Onions, and Shallots
Monkey Bread
Mashed Potatoes with Gravy
New England Clam Chowder
Steamed Broccoli
Pasta
Chicken Pot Pie
Served with: Scagliola Primo Bacio, Moscato d'Asti 2011 (a white sparkling wine, my favorite!)
I shopped at both Shoprite and Trader Joe's for my ingredients. In determining that it was only going to be the two of us, I decided to forgo a turkey in favor of a smaller bird, the chicken. The one I picked up was around 3.8 lbs which made the total baking time 112 minutes. The menu above is pretty much the order that that I prepped and cooked things with the chicken taking the longest and the pasta and pot pie last.
Garlic Herb-Roasted Chicken with Potato, Onions, and Shallots
 I am a picky eater so no carrots or other root veggies in this one. I also did not get any additional ingredients so I went with whatever was available in my kitchen.
Ingredients:
The Menu
Garlic Herb-Roasted Chicken with Potato, Onions, and Shallots
Monkey Bread
Mashed Potatoes with Gravy
New England Clam Chowder
Steamed Broccoli
Pasta
Chicken Pot Pie
Served with: Scagliola Primo Bacio, Moscato d'Asti 2011 (a white sparkling wine, my favorite!)
I shopped at both Shoprite and Trader Joe's for my ingredients. In determining that it was only going to be the two of us, I decided to forgo a turkey in favor of a smaller bird, the chicken. The one I picked up was around 3.8 lbs which made the total baking time 112 minutes. The menu above is pretty much the order that that I prepped and cooked things with the chicken taking the longest and the pasta and pot pie last.
Garlic Herb-Roasted Chicken with Potato, Onions, and Shallots
Ingredients:
- Whole roasting chicken (with gizzards removed)
- 20 cloves of garlic
- 2 medium onions
- Several red bliss potatoes
- 1 large shallot
- Herbs - salt, pepper, thyme, rosemary
- Butter (softened)
Wednesday, October 30, 2013
Garlicky Light Pasta with Swiss Chard and Red Onions
I love, love, LOVE pasta. It's so versatile and simple to make. I got swiss chard and a giant red onion in my CSA share so this was my favorite way of incorporating it into a meal.

Garlicky Light Pasta with Swiss Chard and Red Onions
Ingredients
Garlicky Light Pasta with Swiss Chard and Red Onions
Ingredients
- Pasta of your choice (I used bowties)
- 5-8 stalks of swiss chard (chopped, leaves discarded)
- 1/3 of a red onion (chopped)
Seasoning/Dressing
- Salt
- Pepper
- Olive oil
- Garlic powder
I used my large sauté pan with the deep sides and a 4-qt pot for this. For the sauté pan, I filled it with 1-2 inches of water and brought that to a boil. This was for the swiss chard. In my pot, I filled it up and boiled water for the pasta.
To prep the chard, wash it thoroughly and then arrange the stalks in a bundle. Then, you can easily chop it into small pieces. I made the pieces probably 1/8 of an inch thick since I like my chard very small. Chop it close to where the leafy greens start. If you like having the fronds of the chard, feel free to keep that for another dish. For the purpose of the pasta, the idea is to have the crisp chard bits scattered throughout.
As you boil the chard and the pasta, you can cut up the onion. I had a huge red onion so I only used about 1/4 of it but for a regular, medium-size, you can probably use 1/3 of it. I love using onions with my pasta whether it's plain or in pasta sauce.
At this point, you can drain your pasta and leave it to the side. For the chard, drain it over a strainer and then you can throw it back into the sauté pan. Drizzle some olive oil and get it sizzling before adding in your onions. Then, season it with salt and pepper. After 10 minutes in the pan, add in your pasta and mix it well. I sprinkle a generous amount of garlic powder now since the pasta will taste really plain otherwise. Feel free to adjust the amount of olive oil and salt and pepper to taste. I generally just use a couple tablespoons of oil so that it coats the pasta lightly.
Now, you're all done! You can plate it, add some parmesan or parsley on top and you've got a meal.
Thursday, October 17, 2013
Homemade Croutons
How many of you like croutons? They're crunchy, full of flavor, and can add some extra YUM to your meal. I love eating them plain sometimes as a snack.
Do you usually buy your croutons pre-made or make your own? I used to buy these bags and boxes of them pre-made for about $2-$4 each. When you think about it, you're spending a lot on something you might use every day (if you eat salads all the time). Why not make it fresh from your own kitchen?
Homemade Croutons
Ingredients
If you're ambitious enough to make your own bread, great! I just use a store bought loaf of plain white bread. One slice of bread = enough for one salad and then some.
Take the bread and cut it into cubes. Lay out the pieces on a sheet of foil, drizzle with olive oil or melted butter and then generously sprinkle your desired seasonings.
Toast until browned and there you have it! Delicious, fresh homemade croutons. So simple and so fast!
Do you usually buy your croutons pre-made or make your own? I used to buy these bags and boxes of them pre-made for about $2-$4 each. When you think about it, you're spending a lot on something you might use every day (if you eat salads all the time). Why not make it fresh from your own kitchen?
Homemade Croutons
Ingredients
- bread
- butter or olive oil
- seasoning (salt, garlic, basil, etc)
If you're ambitious enough to make your own bread, great! I just use a store bought loaf of plain white bread. One slice of bread = enough for one salad and then some.
Take the bread and cut it into cubes. Lay out the pieces on a sheet of foil, drizzle with olive oil or melted butter and then generously sprinkle your desired seasonings.
Toast until browned and there you have it! Delicious, fresh homemade croutons. So simple and so fast!
Saturday, October 12, 2013
Chinese Turnip Cakes (蘿蔔糕)
Today I'd like to introduce you to one of my dim sum favorites! Every time I go back to Taiwan or China to visit my relatives, I always order these to eat. Mmm!

Pronounced luo buo gao, it's a comfort food that is starchy and crispy. Chinese turnip cakes are often available for dim sum in restaurants and often found as a snack on the streets of Taiwan, Hong Kong, and elsewhere. It is typically served with a thick, sweet soy sauce. It is made from shredding up turnip and mixing in dried shrimp, Chinese sausage pieces, and mushrooms to add flavor to it.
Making it from scratch is actually fairly easy but I always go with the store-bought pre-made block. You can typically find it in your Asian supermarket's refrigerated aisle. It's convenient and costs about $4 for a block (similar to the size of a tofu block) and you can cut it up into 14-16 slices of medium thickness, then fry it in a pan. Perfect for two people to share. As pictured, I only used half a block for a midnight snack.
I heat up the pan over medium heat with a little bit of oil and then just lay in the slices. You let it cook for 5-10 minutes until brown and crisp on one side. Then, flip 'em over for the other side to crisp up. I also like to turn the slices so that they stand on their side and crisp those edges as well!
Wednesday, September 25, 2013
Stir-Fried Chicken Udon
I am a huge fan of Japanese food. One of my favorites is stir-fried udon. Typically, udon noodles are used in a noodle soup, but I love having it stir-fried. You can buy packaged udon from your local Asian supermarket. I typically buy a five-pack pre-cooked which comes with the soup base individually packaged as well. This makes prep so fast when you want something to eat.

Ingredients:
- 2-3 packs of udon (I use 3 for two people since we eat lot!)
- 1 chicken thigh (slice the meat off the bone into small cubes)
- 1/2 an onion (chopped)
- Taiwanese bok choy (chopped)
- scallions (chopped)
- salt & pepper
- soy sauce
First, stir fry the chicken over medium heat with some vegetable oil. I wait until most of the pink is gone before adding in the salt, pepper, and a dash of soy sauce. Then I stir until all of it is evenly coated and the chicken takes on a nice brown from the soy sauce. Put this aside in a bowl now.
Next, cook the veggies. I did the onions first since they take a little longer to soften and then added in the bok choy. Add a little bit of water and cover to let it simmer. In about 5 minutes, it should be done. Now, add some salt to taste.
Add in the udon. I just rip open the package and plop it right into the pan. If you still have some water left in the pan, great, if not, add a little in. I like to stick my chopsticks in to break apart the noodles. Then cover it and let the udon noodles soften.
After the noodles have softened, add the chicken back in. Then add the soup base packet in. Since I used 3 packs of noodles, I only used 2 packs of the soup base. That way, it's not overly salty since it's meant for use as the soup. Now, you just stir fry the noodles until it is well mixed. Add scallions on top and give it a good mix before plating.
Monday, September 23, 2013
Sauteed Shrimp and Scallops
This one is an easy one, especially if you have pre-peeled shrimp. The ones I had were tail only so once I peeled those off, I was pretty much ready to go.

Ingredients:
- 1/4 lbs medium shrimp
- 1/8 lbs scallops
- 4 cloves of garlic (minced)
- sliced scallions
- Hoisin sauce
The first thing you prep is to defrost your shrimp and scallops. If you use fresh, great, but I use the conveniently frozen packs. I let them soak in a tub of water until they are soft.
Then, I add vegetable oil to the pan and set it to medium heat. I mince up the garlic while I wait. Add the garlic in and let it sizzle for the fragrance to come out. Then add the shrimp and scallops. I like to neatly place them in the pan and then flip each one individually. Once both sides are mostly done cooking, I mix it up with a spatula. You want to make sure that the shrimp and scallops are dry if you want a good sear.
The last step is to add the Hoisin sauce. I scooped about two teaspoons of it and mixed everything up. Let it saute for a bit and then plate it. Add the sliced scallions for garnish.
There you have it. Simple and flavorful. This is best served with rice and other veggies to complement it.
Saturday, September 21, 2013
Pasta with Ground Pork and Broccoli
This is my first post with step by step photos! Yay, let's celebrate with some yummy food. I am a huge fan of pasta and how versatile it is. Typically, I mix whatever I want into it and add herbs and spices to enhance my store-bought sauces.
Other:
- Your choice of pasta (this one was elbows)
- Olive oil

I had precooked my pasta (in this case, elbows!) and my ground pork so this was a fairly quick affair. I chopped up the garlic, shallots, and broccoli first, leaving the messier tomatoes for last. Heat up your pan to medium heat and add some olive oil. I recently bought a new hard-anodized set from KitchenAid and I love it! Works wonderfully. I am using the 3-qt saute pan here.


Once the broccoli has softened, throw in the tomatoes.

Add a few tablespoons of white wine. Let it simmer for about 5 minutes. At this point, I am also squishing the larger pieces of tomato smaller.

Now here's when I add in a dollop of the store-bought sauce. I used Prego's pesto marinara for this one. The reason why I use this is because I don't have any tomato paste or a food processor to make a finer sauce.


Now because I have already precooked the ground pork, I add it in now and mix up the sauce.

Cover and let it simmer for 10-15 minutes to let the sauce really thicken up.

Check for a nice, even mix and consistency. Oh, look at that steaminess~

Once you feel that the sauce is done (give it a taste!), you can add in the pasta directly to mix it up.


I love elbow macaroni since they're bite-sized! I give the pasta a good toss to distribute the sauce. And there you have it--a hearty bowl of pasta with meat sauce!

Since I've participated in the farm share program locally, I've been getting a bunch of tomatoes. I am not a fan of having tomatoes raw or anything so there's only one surefire way to cook 'em--pasta sauce! Mmm!
So, let's get started.
Meat Sauce Ingredients (total prep: around 30 minutes)
- a few cloves of garlic (minced)
- one shallot (minced)
- a few stalks of broccoli (chopped up small)
- two medium-sized tomatoes (chopped)
- white wine
- some marinara sauce
- 1/4 lbs ground pork
- seasonings (salt, pepper, garlic, powder, basil, etc)
- milk
- Parmesan cheese
Other:
- Your choice of pasta (this one was elbows)
- Olive oil
I had precooked my pasta (in this case, elbows!) and my ground pork so this was a fairly quick affair. I chopped up the garlic, shallots, and broccoli first, leaving the messier tomatoes for last. Heat up your pan to medium heat and add some olive oil. I recently bought a new hard-anodized set from KitchenAid and I love it! Works wonderfully. I am using the 3-qt saute pan here.
First, I start by frying the garlic and shallots until fragrant. Love the smell of these sizzling in the pan!
Meanwhile, I prep the tomatoes. I sliced off the tops and bottoms and the skin. Then I cut slices, which I then proceeded to chop into small pieces.
Next, add the broccoli in.
Once the broccoli has softened, throw in the tomatoes.
Add a few tablespoons of white wine. Let it simmer for about 5 minutes. At this point, I am also squishing the larger pieces of tomato smaller.
Now here's when I add in a dollop of the store-bought sauce. I used Prego's pesto marinara for this one. The reason why I use this is because I don't have any tomato paste or a food processor to make a finer sauce.
My boyfriend is picky about the flavor of the sauce so I always alter it with a bit of milk or whipped cream. In this case, I added a splash of whole milk and some Parmesan cheese. I also add my seasonings to taste. I love adding garlic powder and basil for flavor in addition to regular salt and pepper.
Now because I have already precooked the ground pork, I add it in now and mix up the sauce.
Cover and let it simmer for 10-15 minutes to let the sauce really thicken up.
Check for a nice, even mix and consistency. Oh, look at that steaminess~
Once you feel that the sauce is done (give it a taste!), you can add in the pasta directly to mix it up.
I love elbow macaroni since they're bite-sized! I give the pasta a good toss to distribute the sauce. And there you have it--a hearty bowl of pasta with meat sauce!
Friday, August 2, 2013
CSA: Onions! And more!
So, it's now the fourth week of my weekly veggies from the CSA share and it's great so far!
This week I got some onions with the full stalks attached! Never seen onions this way before since supermarket ones are always detached and dried outer layers, but these were white onions with the fresh stalks. I can't wait to cook with them tonight!!
The other items I got was more corn, lettuce, kale, zucchini, celery, and cucumbers. I tried to make zucchini fries last week but they didn't turn out so good. Failed attempt so I gave my zucchini away this time around. For my cucumbers, I had sliced some up into strips for a cool snack. The rest I had sliced into discs for beauty purposes. For my lettuce, I'll probably make another simple salad out of them. Too bad I don't have croutons on hand to add some crunch to it. The kale I'm hoping to give a try by sautéing and then adding to pasta. Last week, I had boiled the swiss chard I had and it was great with my pasta.
Wednesday, July 24, 2013
Chicken Pasta Salad
So, despite my intention for using the other fresh veggies from my CSA share, I was unable to use them soon enough! Fresh veggies from the farm are definitely different from supermarket veggies. A lot of the items I had wilted or dried up sooner than I anticipated. I am also at fault for putting off using them though.
I made a poor choice in choose to have a pasta salad for lunch today when it's so much cooler out and the a/c is still blasting in the office. (Brr!) This would've been awesome for a hot, hot day.
Nonetheless, it is still delicious.

Chicken Pasta Salad
Ingredients:
I made a poor choice in choose to have a pasta salad for lunch today when it's so much cooler out and the a/c is still blasting in the office. (Brr!) This would've been awesome for a hot, hot day.
Nonetheless, it is still delicious.
Chicken Pasta Salad
Ingredients:
- Can of chicken in water (mine was Kirkland/Costco brand)
- Pasta (I chose penne rigate)
- Onion
- Scallions
- Mayo
- Salt & pepper
- Garlic powder
Prepping is quite simple. Set the water to boil the pasta. And chop up the onions to a smaller size and chop your scallions. Mine were already cut up previously. I am so glad I chopped up the scallions when I got them fresh from the farm. So crisp and delicious! I only used about half of a stalk of scallion for this dish, mostly just to garnish.
After your pasta is cooked, set it aside. I love to precook a half box of pasta and save extra to speed up cooking for other things.
For the chicken, open up the can and drain most of the water out of it. I only reserved a few spoonfuls of it to flavor the dressing. Use a spoon or fork to chop up the chunks and get it looser/stringy. This is usually the texture I like for plain chicken salad too. Then I put the chicken with the little bit of water in a container, added a little more than the same amount of pasta. So my chicken to pasta ratio is probably around 4:6. Then I threw in the chopped onion and scallions and sprinkled salt and pepper. Threw in two spoonfuls of mayo, some garlic powder and mixed it all up.
Set in the fridge and voila. A great premade lunch for the next day. Mm!
Monday, July 22, 2013
CSA: Potatoes and more
Part of my share from the farm last week included some small red bliss potatoes. Now, I LOVE potatoes. The starchiness and the many ways you can make it...potatoes are great for all sorts of things.
With my potatoes, I simply boiled them and mashed them for rough mashed potatoes. I've recently been using this dip mix I got from our local farmer's market called, Gar-la-la. I've used it to complement my pastas mostly but it's perfect for mashed potatoes as well! So I used some of the Gar-la-la Herb de Provence and added a little more seasoning to taste. Melt some butter on top and voila! Delish.
For the other veggies, I got some celery, kale, zucchini, and cucumbers. Also, more squash but since I'm not a fan, I will be giving those to my landlord. Can't wait to try new recipes though!
Monday, July 15, 2013
First try with Fennel
Part of the box of veggies that I received from my CSA participation was a few stalks of fennel. Fennel's bottom bulbs, stalks, and tops (which look like dill) are all edible. Since I am not familiar with fennel at all, I had looked up some recipes and decided to give it a try.
Being conscious of how it might not be to my tastes, I opted to keep a bunch of the tops or fronds to use for seasoning. I cut a bunch, rinsed it, tied it up, and hung it from a cupboard to dry. After reading about how most people treat it, I think I'll take the fresh fronds and mix it into butter for use when cooking meats or fish. It sounds like the most delicious way to preserve the crisp flavor.
For the rest of it, I actually discarded the middle section of stalks since there wasn't much of it for my fennel and sliced up the bottom bulbs like I would onions. From cutting it, I realized the consistency of it was very similar to celery. So, into a salad it went!
I love having potato salad and because I had potatoes left, I boiled them up for potato salad. Cut them into cubes and threw in some elbow macaroni. Topped it off with mayo, minced garlic, garlic powder, salt, pepper, dried basil, and a little bit of milk. Then, I threw in the chopped fennel bits and mixed it all up.
The result: a refreshing crunch packed with flavor when I had a bite of the salad. I realized that the fennel flavor was still a little overpowering so I'll be adding in more pasta to offset the amount of fennel I have in the salad overall. But still, a fairly good experience for my first try with fennel.
Sunday, July 14, 2013
Community Support Agriculture (CSA) - Simple Salad with Olive Oil
So, being the adult that I am, I ponied up some bucks for a share of my local farm's CSA program. I should've taken a picture of the box of veggies I received for the first week but it's great so far! The items I got were: corn, lettuce, scallions, beets, cucumber, squash, swiss chard, and fennel. Now, I'm not really a green veggie person, but getting this box forced me to learn how to make new things and try new things, like chard and fennel.
The first thing I did with the veggies--I decided to make a simple salad out of the lettuce I had.
Ingredients:
The first thing I did with the veggies--I decided to make a simple salad out of the lettuce I had.
Ingredients:
- lettuce (I had two kinds so I mixed both)
- 1/4 of a sweet onion
Dressing:
- olive oil
- garlic powder
- salt & pepper
- basil (dried seasoning)
A very quick fix! I washed and rinsed the lettuce thoroughly before chopping it up. Then, sliced the onion into smaller slices. Tossed and let sit. For the dressing, I literally dumped all of the seasonings right into the olive oil and mixed well. If you know what your taste buds like, you'll put just enough of each seasoning (pinches, really) to taste. I love garlic powder so I added more of that than anything else. Once it was mixed in with the salad (chilled), it made a perfect lunch.
Monday, April 29, 2013
Elbows with Italian Sausage and Onions
I have recently adopted a puppy (lab mix!) so it has been ten times more difficult to cook anything extravagant when I cannot spend hours to prep and cook. So, what are some of the easier things to make in short notice? Pasta!
I love pasta in all sorts of shapes and sizes, but the classic elbow macaroni can do no wrong. It's versatile, bite-size, and cooks quickly.
Elbows with Italian Sausage and Onions
Pasta Ingredients:
- box of elbow pasta (I used Barilla)
- Italian sausage
- 1 med/sm onion chopped
Sauce:
- tomato sauce (Ragu traditional)
- seasonings (basil, oregano, garlic powder)
- whole milk
For today's lunchbox, I had precooked the sausage over the weekend.
The way I cook my sausage is fairly simple. I heat up the pan, put the sausages in whole, let it sizzle, add a splash of water and cover it to simmer on a medium heat. Once the water is dried and the sausage is brown, I take it out and put it into a container. Even if the inside is not fully cooked, when I take it out and cut it up to cook, it finishes up nicely. Total cooking time can vary, usually it takes me about 20 minutes.
First, heat up your water and boil the pasta. I let this go on the side while I prep my ingredients. Your total cooking time if pasta and ingredients are cooked simultaneously should take around 15-20 minutes.
I sliced up the sausage and chopped my onions. I heated up the pan with vegetable oil and fried the onions. After they were cooked through and browning, I added in the sausage. Stir and cook it for a few minutes. Once the flavors are wafting to your nose, add in your desired amount of tomato sauce. For my sauce today, I mixed in about 1/4 cup of whole milk to make a lighter sauce. Add in your seasonings to taste and then let it simmer.
Before or close to this point, your pasta should be fully cooked. Drain it and then you can add it straight to the pan and mix it with the sauce.
Then, put into a bowl to serve. Enjoy!
Sunday, November 18, 2012
Homemade Mashed Potatoes
Thanksgiving is coming up soon and one of my absolute favorite dishes is mashed potatoes! You might think that making it homemade is difficult to get the right consistency but it's really quite easy!

Ingredients:
- 1 small/medium-sized potato = 1-2 servings (Yukon or Russet, whichever you prefer)
- water
- milk or cream
- butter
- salt, pepper, garlic powder to taste (or use fresh minced garlic)
- other seasonings
- masher
So pictured above in my glass lunch container is one portion made only from one potato. Still looks good, doesn't it?
What I did first was wash and scrub the outside of the potato a little before putting into a pot of water. Then, heat the water until it boils and let it simmer for about 10-20 minutes until the potato is fork-tender. I typically jab at it with my wooden spoon and if the skin breaks, it's good.
Pour out the water and let it cool. You can do this quickly by rinsing it in cold for a bit or doing an ice bath. Next is to peel the skin. As long as you cooked it long enough, the skin will slip right off. You can peel the skin off while the potato is submerged in water or peel it right off into the trash.
Once peeled, place the potato in a larger bowl so that you have room to mash. The masher is use is a wire masher:
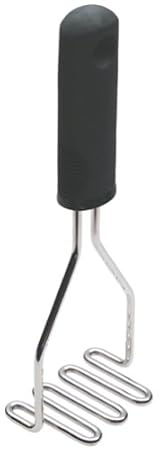
First, cut up the potato into smaller chunks. Then, you simply dig in and mash it up. I like to throw in a slab of butter as I start mashing. Once I start getting into "mashed" consistency, I add in some milk to make it creamy. If you have any heavy cream/half&half/whipped cream..whatever floats your boat, feel free to use it. Just add it in sparingly. So, pour some in, mash and mix, and pour in more if necessary. Explore this until you get your desired consistency. If you like less chunky mashed potatoes, you'll have to mash it more with more cream.
At this point, I also like to add in my seasoning. You'll want to add lots of salt since potatoes are very plain in nature. I don't care much for pepper so I only add a little. Now, I LOVE garlic mashed potatoes. If you're feeling lazy, go with garlic powder. If you're up for it, chop and mince some fresh garlic. (You'll get better flavor that way.) I also like to add in dried basil and parsley as well. Be creative with it! One time, I was going for cheesy so I took a cheese packet from a mac n cheese and poured some of it into the mashed potatoes. You can always use fresh grated cheeses for authentic flavor instead.
And that's it! Boil, peel, mash, mix, and voila! Mashed potatoes!
Monday, July 23, 2012
Light Potato Salad
Perfect for summertime! I had made a small batch in advance and when I got home from work, I was able to enjoy some nice, cold potato salad. A very easy make!
I boiled two medium russet potatoes in water. Peeled the skin once they were done. Chopped them up into cubes and seasoned. For the seasoning, I first mixed a little bit of milk with two spoonfuls of mayo. Then tossed in an even amount of salt, pepper, and garlic powder. Added a dash of dried parsley. And to finish it off, I mixed in a few spoonfuls of finely chopped onion and scallions as I mixed the potato up. Then, popped it in the fridge and left it to the next day to enjoy. It was the perfect snack on a hot day.

I boiled two medium russet potatoes in water. Peeled the skin once they were done. Chopped them up into cubes and seasoned. For the seasoning, I first mixed a little bit of milk with two spoonfuls of mayo. Then tossed in an even amount of salt, pepper, and garlic powder. Added a dash of dried parsley. And to finish it off, I mixed in a few spoonfuls of finely chopped onion and scallions as I mixed the potato up. Then, popped it in the fridge and left it to the next day to enjoy. It was the perfect snack on a hot day.
Wednesday, February 15, 2012
Glutinous Sticky Rice

Mmm! There's a lot of yummy stuff out there but the food you'll always crave the most is comfort food. The food I usually crave is flavor-filled and stomach-filling.

A lot of prep goes into making sticky rice. You have to presoak the rice, prep whatever you want to add in to rice, and combine it in the end. I googled a rice cooker recipe and then combined all the ingredients in a frying pan. The style I'm used to is Taiwanese style but Cantonese style is great as well. The most difficult part of making this is getting just the right amount of flavor. Mine was still a little flavorless even though the soy sauce color came through. Have to experiment with this one some more!
Monday, October 24, 2011
Steam-Fried Dumplings (Guo Tie) and Xiao Long Bao

An easy go-to to keep in the freezer are dumplings! They are actually quite quick to prepare and so tasty if done right. Typical methods for dumplings are either to boil it in water or to fry them. The method my mom taught me works wonderfully and it's so easy!
- Add some vegetable oil to a heated pan at medium-high to high.
- Layer in the dumplings so that their flat bottoms touch the surface of the pan.
- Add in water to cover the dumplings a little under halfway.
- Let the water boil until it dries out. This takes about 10 minutes for smaller amounts and possibly 20 minutes for a large pan filled all the way.
- Once the water dries completely, watch for signs of crisping on the bottoms and take them off the pan when it's fried to your desired crispiness.
Five steps, frozen food, hot pan and oil and water. So easy!
Now, for the mini pork buns (xiao long bao), I tried steaming them as restaurant ones are always steamed. That turned out much harder and to be a lengthy process. I used the same technique as I did for my dumplings (since these were also frozen) and it works just as well for the xiao long bao! The only thing you have to be careful about is keeping the buns placed spaciously in the pan so that they don't touch each other. Once they stick together, it will tear a hole in the skin more easily and then all the delicious juices will escape. So, after steam-frying the xiao long bao with the same technique, I carefully transferred them to a plate. When I bit into them...ooooh so juicy and meaty! I even tried packing some for lunch after cooking them and it turned out just as tasty after coming out of the microwave. Success.
Subscribe to:
Posts (Atom)